|
Just like puppies, baby chicks are unbelievably adorable and loveable. And just like puppies, they're a handful! That said, we totally recommend it for anyone looking for a "pet" flock. This chapter covers all the basics of baby chick care.
As mentioned in the last chapter, baby chicks can be purchased here at My Pet Chicken, at a poultry hatchery or garden/farm supply store. (If you need help deciding on the breed, give give our free Which Chicken tool a try.)
Clearing Your Schedule
Baby chicks require constant care and monitoring, so make sure your schedule is clear for the first 4 weeks! Don't plan on vacations or even day trips unless you have a seasoned baby chick pro on standby. Make sure you or a member of your family are available to check on them at least 5 times a day.
Deciding Where They're Going to Live
You can keep young chicks almost anywhere: their small size makes them easy to handle! They grow quickly, though, and by the time they're three or four weeks old they'll be taking up a lot of space and making a big mess, so preparing a living space for them is actually quite important. (The good news is that you can transfer them to their outside coop at 4-5 weeks of age, so you won't have to deal with the mess for too long... More on that below.)
Ideally you'll have a garage, workshop, basement or another predator-proof and draft-proof environment that's not in your main living space. Why not the main living space? Baby chicks, just like grown chickens, love to "scratch" their bedding materials, which creates a very fine dust that gets everywhere. The older they get, the more dust they make. Baby chicks also have a smell... It's not decidedly bad, nor do we find it overwhelming, but you may not want it in your house.
If you don't have a garage, workshop or basement in which to keep them, pick the next best option. Do you have a three season porch where it won't get too cold? A spare bedroom whose surfaces you can cover? If none of the above, does your kitchen have an eat-in area not too close to prep surfaces that you're willing to sacrifice for a few weeks? Choose the best possible option keeping in mind that wherever you keep them, they must be safe from predators and drafts.
Creating a Suitable Living Environment
This is the one of the most important part of raising happy, healthy chicks.
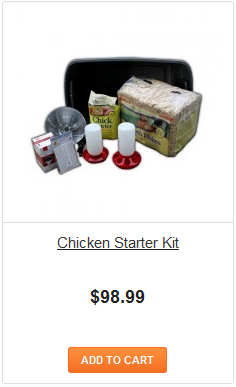
The baby chick house (also known as the "brooder")
Baby chicks need to be protected from drafts but still have adequate ventilation. This can be in the form of a cardboard box with holes for ventilation, a single-faced corrugated cardboard roll, 12" or higher, a large plastic storage bin, or even a kiddie pool! All of the above have been used with success.
Whatever housing solution you go with, make sure it provides 2 square feet per chick. It sounds like an awful lot, but as they get older (and bigger) you'll realize why this is necessary.
A heat source
Baby chicks need to be kept pretty hot. Think sauna! The first week of their lives they require an air temperature of 95 degrees, the second week 90 degrees, and so on - going down by 5 degrees per week until they're ready to transition to "outside". A 250-watt infrared heat lamp is the best way to achieve this, placed right in the middle of their living area and suspended off the ground. The height of the light will depend on what it takes to achieve your target temperature.
We recommend a red heat bulb for a few reasons: one, with a bright white light constantly glaring it can be hard for them to sleep. The red light is darker and provides them some respite. Two, red lights help prevent them from pecking one another. We sell both red and white heat bulbs plus the brooder lamps.
Pay close attention to how your chicks behave. If they're all crowded together directly under the heat source, they're cold. Lower the heat lamp or add another one. If they're around the edges of the brooder, avoiding the heat and each other like the plague, they're too hot! Raise the heat lamp. A happy flock will happily be exploring all around the brooder.
And please do not listen to anyone that tells you a regular old 60 watt bulb will suffice! We've seen chicks die from this bad advice. They really need a lamp intended to produce heat, and as we've mentioned, we recommend the 250-watt variety.
Absorbent bedding
Baby chicks are big poopers, so make sure to line the floor of their housing unit with an absorbent material. The best, we think, is to spread pine shavings about 1" thick. Resist the urge to use newspaper! It's not nearly as absorbent and the slippery surface can lead to a permanent deformity called "splayed leg" which can ultimate result in the other chickens picking on the affected bird to death. Many people also swear by paper towels, changed often. (DON'T use cedar shavings, no matter what friends or your local feed store tell you: the aromatic oils will irritate your chicks' lungs, and make them more susceptible to respiratory problems later in life.)
A drinker/waterer
We recommend you don't try to use a dish, a rabbit drinker, or anything you have just "laying around". Baby chicks have special needs when it comes to water. Dishes can make it easy for chicks to drown, and they'll certainly do naughty things likwe walk in it, spill it, kick their bedding materials into it, and poop in it -- meaning you'll have to change it constatly. Rabbit drinkers aren't preferable, either, becuase not enough chicks can access it at once. For the best results, we recommend you use a chick waterer. They come in a number of different sizes and shapes, all basically sufficient.
Keep in mind that even with the best drinker, they'll still kick bedding materials into it and find ways to poop in it from time to time. Raising the waterer off the ground somewhat will help (starting their second week of life), but no matter what they're going to get that water messy, so plan on changing it a few times a day.
A feeder
Once again, we recommend you resist the temptation to use a dish or bowl for feeding your chicks. They're messy, and they'll jump in and kick the feed all over the place, poop in it, and worse case scenario: they'll tip it over and trap a baby underneath. (This has happened!) Spend those few extra dollars and buy a "real" baby chick feeder, or borrow one from a friend. They come in many shapes and sizes, and we offer the very baby chick feeder we use for our chicks.
Bonus: Roosting Poles
Chickens love to roost on poles or branches when they're resting. You don't HAVE to provide your brood roosting poles, but they'll be even happier if you do. We like half inch diameter wooden dowels. Try them about 5 inches off the ground. (They may like it so much they won't roost on top of your feeder and waterer!)
Feed
Fortunately this one doesn't require much thought! Suppliers have formulated special feed complete with everything baby chicks need. It's called "starter feed" and comes in either "crumbles" or "mash" (referring to how ground down it is). Either is fine. The only thing to know is that if you've had your chicks vaccinated against Coccidiosis, they'll need an un-medicated feed. If not, or if you've only had them vaccinated for Marek's Disease, medicated feed is a great way to keep them healthy those first few months. We also offer a terrific organic chick starter feed.
A question we commonly get is how long to feed baby chicks "starter feed" for before switching to a feed called "grower" or "chick grower". The answer is: it all depends! Each manufacturer formulates their feed differently, so read the label and follow their instructions. Some only recommend the starter for 4 weeks before moving onto grower; some combine both together in a "starter/grower" feed that can last up to 16 weeks, etc.
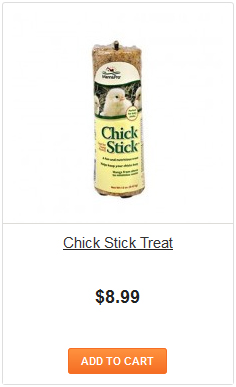
Customers also will ask us whether they can feed their chicks scraps, or worms and other bugs from the garden... Small amounts of vegetable/dairy should be fine for the chicks (and they'll love it!), and the same goes with bugs and worms. But consider those like dessert, not the main course. Starter feeds contain everything chicks need to survive and thrive, and filling them up with too much of the "other stuff" can throw off their nutritional balance.
Finally, people want to know how much food they should give their birds. The answer is: as much as they want! Don't ration it. Give your birds 24/7 access to all the food they can eat. They're not like dogs. They'll self-regulate.
Grit
Ever heard the saying "scarce as a hen's teeth"? That's right, chickens don't have them! Instead they eat tiny pebbles and store them in their "crop". When the food enters their crop, the pebbles grind it up to make digestion easier. For baby chicks, sand, parakeet gravel or canary gravel, available at your local pet store or grocery store pet aisle, will suffice. You can either sprinkle this in their feed or provide it in a small cup or bowl.
Netting for the top
Although most grown chickens are pretty pathetic flyers, young chicks are much more capable. If your brooder is only 12 inches high, don't be surprised if you find your week-old chicks perching on top of it! To prevent this, we recommend you cut a section of deer netting or chicken wire just big enough to drape over your brooder, or use a 2-foot-high brooder box to increase the length of time before they're able to "fly the coop".
Bringing Your Baby Chicks Home
First things first: find out what day your chicks will be arriving at the post office. (Some places ship chicks to arrive on Sunday, which isn't terribly convenient, but our chicks ship out on Mondays or Tuesdays and are guaranteed by the post office to arrive by the end of the day Thursday.) Let your postmaster know in advance that you'll need to pick them up as soon as they arrive. If your chicks are coming on a Sunday, there's a good chance your postmaster will go to the office and open it just for you. Those baby chicks need your TLC so the sooner you pick them up, the better! Postmasters understand this and are usually happy to help out. Also, some post offices around the country (like Portland, Oregon, for one!) will deliver the chicks directly to your door. Ask this question of your postmaster ahead of time.
When you get them home, be prepared: one or two may have died in shipping or may be on their "way out". This isn't due to disease. Some chicks are born less hardy than others and can't withstand the stress and cold temperatures involved in transporting them around the country. Most hatcheries, in fact, prepare for that by including an extra bird or two for free. (Beware, though, as some hatcheries will throw in roosters even if you didn't order them! We're proud to say that if we include extras, we'll only include a bird of the same breed and sex as one you've ordered.) Care for the weak birds as best you can, and bury the dead birds as you would any other pet. Also, call the hatchery right away to let them know if a bird dies. They'll usually either give you a partial refund or a discount on your next order so long as you notify them within 24-48 hours of arrival. (Our policy is 48 hours.)
A note for parents ordering chicks
Since baby chicks do die from time to time in shipping, we recommend that if you've got young children you A) Do not tell them when the chicks are coming, B) Do not tell them how many chicks you've ordered, and C) Do not have them with you when you inspect the box for the first time. This way if there are any losses, you can deal with them without the kids ever being the wiser. Losses are not common, but when they do happen they can be devastating to little ones.
Important health notes
Pasting Up
As you move your baby chicks from their shipping box into their brooder kit (which you've set up and heated in advance, of course!), check them for "pasting up", a condition in which their droppings cake up and block their vent opening, preventing them from passing any more droppings. This problem will be pretty obvious; you won't have to go poking around their insides to see it. The dried poo will be stuck to their outside, totally or partially covering their vent. This is a deadly condition and must be resolved with immediately. We recommend you apply a warm, wet paper towel to their rears and then use a toothpick to clear the blockage. In especially bad cases you may have to dunk the chick's rear in warm water before it will loosen up enough to remove it. Your chick will complain, loudly, but stand fast in your determination knowing that the chick will die if you don't! Then, dry the chick off with a blow dryer and immediately return her to the brooder kit with the others. And keep checking the birds that presented with this problem, for it often returns throughout the first week.
Immediate access to water
Your new brood will need water right away. Watch them carefully once you've transferred them to their new home. If they aren't finding the water, pick an especially spritely one and gently put its beak into the water. This should be enough to teach them - once one chick's drinking the others are sure to follow! The same goes with the food: make sure they're finding it. If not, show them. Resist the temptation to feed your chicks water with a syringe. This can cause death by drowning, even if you're very careful about it. Just gently dip their beaks in water. If one is still not drinking, chances are it is struggling to stay alive and may not make it.
The Umbilical Cord
Some baby chicks will arrive to you with an intact, attached umbilical cord. It looks like a very thin black string, attached to their rear. For heaven's sake, don't pull it! It's not "pasting up"! Just leave it alone. It will fall off within a day or two. Pulling it can really injure them.
Ongoing Chick Care
Keep checking up on your chicks several times a day. They'll be doing naughty things like kicking up their bedding into the feed and water, and you'll have to clean up after them. (Don't forget, they need round-the-clock access to all the food and water they can get their beaks on!) Also pay close attention to their behavior. We said it before and we'll say it again because it's key: If they're crowded together directly under the heat source, they're cold. Lower the heat lamp or add another one. If they're around the edges of the brooder avoiding the heat and each other like the plague, they're too hot! Raise the heat lamp. Not getting this right can be the death of young chicks.
Changing Bedding
For sanitary purposes and to keep their area from stinking, change their bedding at least once a week. We throw ours in the compost pile where it's happily turned into rich earth.
Heating over time
Don't forget that your baby chicks need less and less heat as time goes by. By their 2nd week the heat can be reduced 5 degrees to 90, by the 3rd week by another 5 degrees to 85 and so on. However, this is just a guideline. Continue tuning into their behavioral cues as described above and you'll know how to tweak their heat. Also, keep in mind that some of your chicks will develop faster than others, requiring less heat, while the "runty" ones will want to be closer to the heat lamp. Make sure your heating set-up gives each chick the choice of how much heat is comfortable to them (in other words, don't create a uniform temperature by putting the heat lamp inside the box and then covering the box!)
Dealing with kids & chicks
If you've got kids or you're planning on bringing kids over to see the chicks, set the boundaries up front. Chicks are irresistibly sweet and cheeky kids tend to harass them. Make sure you watch the chicks; if they show signs of distress, be firm and return them to their brooder. Also, if you have chicks are or were recently pasted up, please instruct your kids to let them be. Over-handling can prevent a chick that's "on the edge" from bouncing back (it can be the death of them!).
Growing... and growing!
As your chicks get older you'll understand why we recommended a minimum of 2 square feet of living space per bird. If you provided them less than that and your older chicks are picking at one another, do expand their living quarters. Both you and the chicks will be much less stressed. And as mentioned above, if they start flying on top of their brooder box, a simple length of deer netting or chicken wire laid on top of their living quarters should prevent it!
"Outisde" time
After the chicks are 2-3 weeks old, if it's warm outside (65-70 degrees at least) and sunny, feel free to let them have a little "outdoor time"! Put them in a wire cage or erect some other temporary housing and place it in the sun, making sure they have access to water and shade if they need it. They'll absolutely love digging around in the grass. But don't leave them unattended! At this age they're VERY good at flying and VERY susceptible to predators. Plus, if it's windy they'll get cold (and they'll let you know they're unhappy with their loud chirping).
By 4-5 weeks of age your chickens are ready to move outside full-time. And thank goodness! As much as you love them, you'll be thrilled to get them out of your house. Read the next chapters to learn about chicken coop requirements, how to transition them to their coop and how to care for them as they get older. Also, keep in mind that if you're purchasing a chicken coop it can take three or more weeks to arrive, so you may want to have that squared away before you get the chicks!
Baby Chick FAQs (Frequently Asked Questions)
Q: Can I combine different breeds in a flock, or will they not get along?
A: Go ahead and combine! No matter what combo of birds you get -- whether it's 25 of the same breed or one each of five different breeds -- one bird will be at the top of the pecking order and one will be at the bottom. This is true whether you get aggressive birds (like Old English Games) or really docile birds (like Silkies). You'll have a "head honcho" that "rules the roost" and a "wallflower" that stays out of the fray for fear she'll get picked on by the others. Also, even if you order purely docile breeds, you could have one with a wacky personality that picks on all the others, or vice versa a reputedly "flighty" breed could end up being your biggest sweetheart! In other words, each bird has their own, unique personality. So don't worry too much about managing your flock. Just go with what you like!
Q: Can I combine bantams and large fowl (standard) birds together?
A: See above. Same goes here!
Q: How much food should I give my baby chicks?
A: As much as they want! We talked about this a little above, but in case you didn't catch it, chickens aren't like dogs -- they won't eat themselves to death. They'll only eat as much as they need. So go on, spoil them! Give them as much food as you can fit in your feeder. They won't overdo it.
Q: Is "pasting up" REALLY a deadly condition?
A: You bet it is! "Pasting up" is described above: it's when droppings cake up and block a baby chick's vent opening, preventing them from passing any more droppings, and it must be dealt with imediately. Apply a warm, wet paper towel to their rears and then use a toothpick to gently clear the blockage, or in severe cases dunk the chick's rear in warm water so it softens up enough to remove it. Dry her off and return her to the brooder kit with the other chicks, and keep an eye on her in the coming days to make sure the problem doesn't return.
|